The purpose of this open exercise is to let you put together all you have learnt during the training in order to build a super simple and naive booking application from scratch.
You will use Angular and Otter schematics to:
- Create an app
- Add Otter dependencies
- Create pages
- Create components
Note that the example of application that we created while writing this codelab is hosted at: https://dev.azure.com/AmadeusDigitalAirline/Otter%20Training/_git/create-app-training
Feel free to have a look if you're in doubt, but try not to rely on it too much for the sake of the exercise ;)
We first need to setup our environment. If not done already, you should have the following softwares installed on your computer:
Also, you should install the following plugins in Visual Studio Code:
- Live Share (ms-vsliveshare.vsliveshare)
- Angular Language Service (angular.ng-template)
A word on auto-resolved imports
Some IDE like visual studio code can be smart enough to propose you the locations you can import your functions/classes/interface from in order to ease your life.
While this is super useful, we recommend you to be careful especially with VSCode because sometimes the import paths are wrong depending on how the TypeScript extension is configured.
Here's what's recommended: 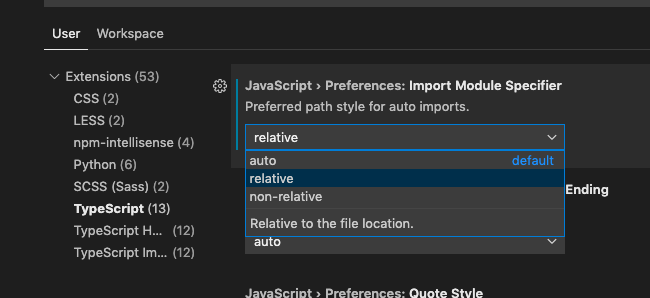
If your code doesn't compile because of an import not found, double check the import statement and more precisely the path in case it wasn't correct.
Example of such an error:
Generated import
import { PaymentFormContModule } from 'src/components/payment-form';
Correct import (relative to your file)
import { PaymentFormContModule } from '../../../components/payment-form';
Attention
Some things can go wrong during the following steps because of your network, firewall or some security programs at Amadeus.
In the event that you can't execute the following steps on your machine, we've prepared a branch on the example repository that's in the state you'd be at the end of this section.
Don't hesitate to start from there if you feel you're wasting time.
But please don't forget to report your problems so we can fix or document them to improve this codelab's experience
In case you are doing this exercise as part of a half-day session, we recommend that you start from the seed branch in order to have more time to code.
Seed branch
Clone the example repository:
git clone https://dev.azure.com/AmadeusDigitalAirline/Otter%20Training/_git/create-app-training
And checkout the seed branch then run yarn to install the dependencies:
git checkout seed
yarn install
Then skip to the next stage of the codelab.
If you have trouble cloning because of your windows credentials manager, go to the repository URL:
https://dev.azure.com/AmadeusDigitalAirline/Otter%20Training/_git/create-app-training
Click Clone (top right), then inside the popup click Generate Git Credentials and run (insert the generated Username and Password in the command):
git clone https://<Username>:<Password>@dev.azure.com/AmadeusDigitalAirline/Otter%20Training/_git/create-app-training
a. Install Angular CLI
First of all, you need to install the Angular CLI globally.
We're going for the latest released for version 15.2 because that's the version the Otter framework we'll be using relies on.
yarn global add @angular/cli@15
Now let's check that you have the right version installed:
ng version
You should see version 15 in the result:
Angular CLI: 15.x.y
Negative : If you have a version other than 15 displayed it could be because you installed angular with npm too, and this is taking precedence over the global yarn installation.
It can be easily checked by running where ng on Windows or which ng on Unix.
Check if the result contains npm or yarn in the path.
If it points to NPM:
- You can run
npm install -g @angular/cli@15to modify your active version of the ng cli - If you don't want to modify it, you can start from the
seedbranch of the example repository (details in the Seed branch section above)
b. ng new
Next thing you want to do is create a new Angular application by running ng new.
ng new
Cheat sheet:
? What name would you like to use for the new workspace and initial project? create-app-training
? Would you like to add Angular routing? Yes
? Which stylesheet format would you like to use? SCSS
Now you can open your new project in an IDE.
All the following tasks will be executed in the project folder, so don't forget to
cd ./create-app-training
We also want to set yarn as the default package manager that angular CLI will use.
In order to do that, just run:
ng config cli.packageManager yarn
c. add Otter dependencies
Let's add otter dependencies to the application.
Note: At this step we need only otter public packages, on next stages we will add the private packages. But that's for a bit later.
To be able to run the otter schematics we need to add the angular schematics package as a dependency.
yarn add @schematics/angular
Now simply run yarn ng add @o3r/core@~8.1.0 and answer to the options as below:
yarn ng add @o3r/core@~8.1.0

The package @o3r/core@8.1.1 will be installed and executed.
Would you like to proceed? Yes
✔ Packages successfully installed.
? Activate prefetch builder to generate prefetcher JavaScript file ? No
? Activate playwright as E2E test system ? Yes
? Add Otter customization mechanism to override presenter and injectable for external application No
? Activate Otter analytics ? No
? Add otter packages ('@o3r/{localization,styling,components,configuration}') to make the aplication CMS compatible ? No
? Add Otter styling setup? Yes
? Add Otter configuration setup ? Yes
? Add Otter rules-engine setup ? No
? Add Otter localization setup ? Yes
? Add storybook setup ? No
? Add APIs manager setup providing the SDK via injectable ? Yes
? Set Otter as default ngCLI generator ? Yes
? Generate the Azure Pipeline for the new project? No
? Which testing framework would you like to use? jest
This operation may take a while since it will add a bunch of dependencies to your package.json and install them.
Otter framewrok requires angular material so you can install the package by running yarn ng add @angular/material@15.
yarn ng add @angular/material@15

The package @angular/material@15.2.8 will be installed and executed.
Would you like to proceed? Yes
✔ Packages successfully installed.
? Choose a prebuilt theme name, or "custom" for a custom theme: Indigo/Pink        [ Preview: https://material.angular.io?theme=indigo-pink ]
? Set up global Angular Material typography styles? No
d. start your application
Easy as pie, simply run yarn start to launch the dev build of your application.
Then access it at http://localhost:4200.
Explore the project in your IDE, especially the src/app folder where you can see:
app.module.tswith an initial setup including some Otter dependencies such asApiManagerModuleandLocalizationModule. We'll come back a bit later to the ApiManager part.app-routing.module.tsthe file that will contain our route definitions. Currently empty, we will come back to it later.app.component.tsthe root component of our application, not doing much right now.app.component.htmlthe template of our root component.
Positive : Open the style.scss file in the src folder and uncomment the lines related to angular material to apply the default theme.
e. Clean app.component.html
This file has been generated with some pointer to angular official documentation, obviously we don't want that anymore.
We want the template to only contain:
<router-outlet></router-outlet>
Before diving into pages and routing, let's create a simple header component as a warm up.
Positive : From now on, all ng commands will be executed from yarn, like: yarn ng generate.
We do that to force using the local installation of the ng-cli in this project in case you have a conflicting version installed globally.
a. Create our header component
Of course, we're not doing this from scratch, let's use Otter's schematics again!
yarn ng generate @o3r/core:component
that will ask some questions. We recommend going for a container + presenter (full) approach since we may want our header to do some smart things in the future, like changing the language of the application or some user log-in.
$ yarn ng generate @o3r/core:component

? Your component name? header
? Specify the structure of the component you want to generate full
? Do you want to generate component fixtures for tests? Yes
? Generate component with Otter configuration? Yes
? Specify your component description Header component
? Skip linter process on generated files? Yes
? Generate component with localization? Yes
? Generate dummy I/O, localization and analytics events No
Optional
To avoid prompting the Skip linter question each time we use the generator, we may want to add the value of skipLinter property directly in angular.json file of our app, under schematics property for each generator entry (component, page, store, service ...).
// angular.json file
"schematics": {
    "@o3r/core:component": {
      ...
      "skipLinter": true
    },
    ...
Advanced
The component generator is composed on 2 specific parts: component-container and component-presenter plus a common part.
So if we want to add default values for other questions, we have to identify which part the questions are coming from. To do this we'll have to look in schema.json files associated to each generator (ex: for component - ./node_modules/@o3r/core/schematics/component/schema.json).
For skipLinter it was easy because it is coming from common part.
b. Use the header container component in the application component
Then go ahead and add the generated container app.component's template.
Negative : Do not forget to import your component's module in app.component's module
c. Modify header-pres's template and styling to your liking
Headers usually take the full width, so you could use CSS display: flex to do something nice, but don't spend too much time there.
Once you're satisfied, let's move to create the first page in our application!
Example: 
This is the first big item on our TODO list as well as the entry point of our application. Here we'll start to touch a bit the business logic with the help of otter library packages (the private packages).
We will also create a search-form component of type full that will:
- Hold a simple search form (origin airport code, destination airport code and departure date)
- Update the
AirBoundsSearchStorewhen it's submitted - Notify the form submission to its parent via an output
a. Generate a page
You're probably used to it by now, we're going to use a schematic to generate a page:
yarn ng generate @o3r/core:page
? Page name? search
? Page scope (e.g. booking, servicing, ssci, etc.)? booking
? Application routing module path? ./src/app/app-routing.module.ts
? Skip linter process on generated files? Yes
? Generate your page with Otter theming architecture? Yes
? Generate your page with Otter configuration? Yes
? Generate your page with localization? Yes
This will:
- Create a new component in
src/app/booking/search. - add an entry to the application routing module, mapping route
/searchto this new component.
Since this will be the entry point to our application, we recommend you to set up this route as the default route in your application routing.
We encourage you to look at the official documentation about how to set up redirects.
You should then be able to access your new page at http://localhost:4200/search.
Negative : You may have to stop and re-launch yarn start in order to access your new page.
b. Search form component
You know the drill, generate a search-form component with:
yarn ng generate @o3r/core:component
Import the container's module in your search page's module, and use the component
c. Presenter: basic version
The search form presenter is where you will code the Angular form. To keep it simple, we want this component to:
- request the following fields
- Departure airport code
- Destination airport code
- Departure date
- display a Submit button
- Via an
@Output, notify its container when the form has been submitted and with which values.
To start simple, let's hardcode our fields for now and focus on the last two points.
Create a SearchData contract
What we want to do first is create an interface defining how the container and presenter should talk to each other.
In that case we want an interface we can call SearchData that would contain the 3 properties we want to convey.
Usually we put these kinds of interfaces in a contracts folder at the same level as the container and presenter ones.
For example:
export interface SearchData {
  departureAirportCode: string;
  destinationAirportCode: string;
  departureDate: Date;
}
Add an output to search-form-pres that will emit SearchData
Since this is our first Angular output here's an example of how you can do it:
@Output() submitSearch = new EventEmitter<SearchData>();
We let you figure out the typescript imports.
Add a button to the template and bind its click event to a function
Since we're using Material we recommend you to use their components as much as possible.
Don't hesitate to look at their documentation, it is very exhaustive: https://v15.material.angular.io/components/categories
Add a button and bind its click event to some function we'll define just after. The result could be something like:
<button mat-button class="submit" (click)="onSubmit()">Submit</button>
Note that this is a native button tag to which we apply a directive from Material.
Negative : Don't forget that you'll have to import the relevant modules in your component, in that case MatButtonModule.
Define the submit function in the component class
Let's now define the onSubmit function in our component class.
It could be something like:
  onSubmit() {
    this.submitSearch.emit({
      departureAirportCode: 'CDG',
      destinationAirportCode: 'LHR',
      departureDate: new Date()
    });
  }
d. Container: update the store and notify the page
Ok, now that our presenter notifies its container of the submission of the form, we want to do something with it.
Our plan is the following:
- Update the
AirBoundsSearchStorestore with the data we receive from the presenter (you'll need to hardcode some fields) - Notify the page via an
@Output()that the form has been submitted
AirBoundSearchStore is the first item linked to the business logic. This is provided by @otter/store package (comming from the inner source library) that you'll need to install. It contains models from Digital Commerce API,therefore @dapi/sdk package should be installed too.
Private packages setup
Negative : To be able to install packages from the private otter library you need to tell yarn from where to get the packages.
Add a .npmrc file to the root of the project with the following content.
Next, run:
yarn add @otter/store@~8.1.0
and
yarn add @dapi/sdk@~2.57.0
Bind a function to submitSearch
The first thing to do is to bind a function to the submitSearch output of our presenter.
You're on your own this time.
Positive : Unlike the previous click event, this time we want to forward the value emitted to our function.
As usual you can find the answer in the Angular documentation
Add a dependency to the AirBoundsSearchStore store and inject it in our container
Things become interesting here since we want to inject a store from the Otter library to accelerate our development.
This is a three steps process:
- Import
AirBoundsSearchStoreModulein your container component's module - Inject the
Storeinstance in the container class's constructor - Dispatch an action to the injected store to add the search criteria and set them as "active"
Since it's our first time, here's a code snippet of the constructor and submit function: selectedBoundId air-bound-input to specify a selected outbound flight when looking for the available return flights. As we will only perform one-way search, you can ignore it.
constructor(private store: Store<AirBoundsSearchStore>, ...)
  onSubmitSearch(searchData: SearchData) {
    this.store.dispatch(addAndSelectAirBoundSearch({
      commercialFareFamilies: ['DEMOALL'],
      itineraries: [{
        originLocationCode: searchData.departureAirportCode,
        destinationLocationCode: searchData.destinationAirportCode,
        departureDateTime: new utils.DateTime(searchData.departureDate),
        isRequestedBound: true
      }],
      travelers: new Array(searchData.numberOfAdults).fill({
        passengerTypeCode: 'ADT'
      })
    }));
  }
To check that everything works, open your Redux DevTools and click the Submit button.
You should see an action that updates the store!
[AirBoundsSearch] add and select air bound search
Add an output that will tell the page we have submitted the form
A simple event that doesn't send any data is enough (EventEmitter).
We will use it later to trigger a navigation from our search page to the next one.
e. (Optional) Enhance the main container's visual
Let's apply two small changes to our app component that will make our current and all future pages look a bit better:
- Wrap the
mat-cardandapp-content - Apply the some CSS rules to the
app-contentclass to make it so it doesn't take the full width and is centered
Example of CSS:
.app-content {
  max-width: unquote("min(1200px, 80%)"); // https://github.com/sass/libsass/issues/2701
  padding: 15px;
  margin: auto;
}
Example of component's template:
<app-header-cont></app-header-cont>

<div class="mat-card app-content">
  <router-outlet></router-outlet>
</div>
f. (Optional) Presenter: build a form using Material components
Positive : You can come back to it later on if you prefer to create a few more pages and manipulate more stores before focusing on the presentation.
However this can be a good opportunity to learn about Angular forms.
What we've built so far works and can be used as a basis to continue our booking flow.
Still, we could make it a lot better without much effort thank to Angular material, so let's take advantage of it to create not-so-bad-looking components.
Here are our objectives:
- Use Material
mat-form-fieldandmat-inputfor airport codes - Use Material
mat-datepickerfor the date - Bind their values to a local variable of type
SearchDatausing template-driven forms (you can opt for reactive forms if you prefer, but they're a bit more complex)
Here's an example of component template, we let you figure out the rest!
<form #form="ngForm">
  <mat-form-field class="example-full-width">
    <input required matInput placeholder="Departure airport" [(ngModel)]="searchForm.departureAirportCode" name="departure">
  </mat-form-field>

  <mat-form-field class="example-full-width">
    <input required matInput placeholder="Destination airport" [(ngModel)]="searchForm.destinationAirportCode" name="destination">
  </mat-form-field>

  <mat-form-field>
    <input required matInput [matDatepicker]="picker" placeholder="Departure date" [(ngModel)]="searchForm.departureDate" name="date">
    <mat-datepicker-toggle matSuffix [for]="picker"></mat-datepicker-toggle>
    <mat-datepicker #picker></mat-datepicker>
  </mat-form-field>

  <button [disabled]="!form.valid" mat-button class="submit" (click)="onSubmit()">Submit</button>
</form>
This template will need several new modules from Angular and Material to be imported:
FormsModulefrom@angular/formsto handle template-driven forms.ReactiveFormsModuleif you opted for the reactive solution.MatFormFieldModulefrom@angular/material/form-fieldto have access to themat-form-fieldcomponent.MatInputModulefrom@angular/material/inputto have access to thematInputdirective.MatDatepickerModulefrom@angular/material/datepickerto have access to themat-datepickercomponents.
And don't forget to update the submit function to emit the values of your new form!
Negative : You'll see and error when importing the Material module related to datepicker. To solve it you will have to do what's suggested in the error: import MatNativeDateModule in your application module
Feel free to enhance it as you see fit and add any kind of validation.
Conclusion
Here is an example of result: 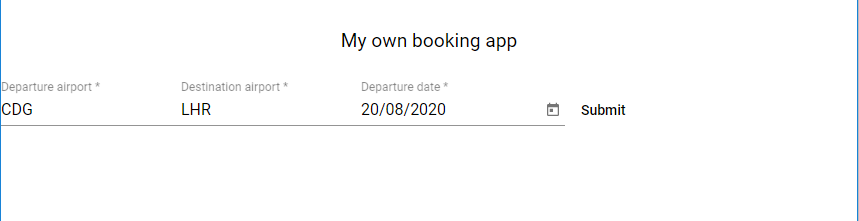
When you're ready, move on to the next page!
Now that we got a landing search page, we want to:
- Retrieve flight availabilities (air-bounds) corresponding to those search criteria.
Note that you will handle AirBoundGroup - a group of items with different prices and benefits (fares) for the same operated flight.
To interact with the Digital Commerce API we will have to configure the access via the ApiManagerModule. Details just after. - Display them, so the user can choose one
- Allow the user to submit a selection. The submission should create a shopping cart with the selected offer and proceed with the booking flow
o. Digital Commerce API endpoints config
The following steps needs to be done in order to be able to access Digital Commerce API endpoints:
- Replace the content of
apiManagerFactoryfunction, with the following code snippet, in the application's module (src/app/app.module.ts):
export function apiManagerFactory(): ApiManager {
  const clientFactsPlugin = new ClientFactsRequestPlugin({
    initialGlobalFacts: {
      corporateCodes: '000001'
    }
  });
  const gatewayPlugin = createAmadeusGatewayTokenRequest({
    gatewayUrl: 'https://test.airlines.api.amadeus.com/v1/security/oauth2',
    gatewayClientId: 'CQZddrc7RFTBmG6Hbl7pQTyiPtHUuOAq',
    gatewayClientPrivate: 'NaeP7dKAgV2emuvi'
  });
  const apiConfig: ApiClient = new ApiFetchClient(
    {
      basePath: 'https://test.airlines.api.amadeus.com/v2',
      requestPlugins: [
        gatewayPlugin,
        clientFactsPlugin,
        new SessionIdRequest()
      ]
    }
  );

  return new ApiManager(apiConfig);
}
- Solve the imports
To be able to access the enpoints first we need to get the gateway authorization. For that we have created an sdk which you need to install. Runyarn add @dapi/amadeus-gateway-sdk.
Now you can import thecreateAmadeusGatewayTokenRequesthelper from the new installed package. For the other missing imports we let you figure it out.
That's it. Now we can use the Digital Commerce API endpoints. Let's continue with the app development.
Note: Here you can find detailed information about how to use the ApiManagerModule to access an endpoint.
a. Generate the page and container/presenter
As we did before we want first to generate a page and a container/presenter couple to handle our upsell form.
You can name:
- The page
upsell - The container/presenter couple
upsell-form
b. Route plumbing
We want to go to our new upsell page when we've submitted a search.
To do that we'll have to instruct the Angular router to navigate to upsell from search when something has been submitted.
This is what it looks like:
  onSubmit() {
    this.router.navigate(['upsell']);
  }
Positive : Do not forget to inject Angular's router in your component class constructor: constructor(private router: Router, ...)
Negative : You may have to stop and re-run yarn start again since you added a page.
c. upsell-form container
This component's container will be a bit more complex since we want it to:
- Fetch air-bounds-groups available to your outbound from DxAPI with respect to our air-search-criteria when it is instantiated and add the result to the store
- Forward the list of available air-bounds from the store to its presenter, so it can let the user choose
- Handle the submission of an air-bound, that is the creation of the shopping cart with that specific air-bound item.
Retrieve air-bound-items
This time we won't inject the store directly (yet) because what we want to do involves a bit of logic:
- Retrieve the air-bound-search we added to the store before when the component is instantiated.
- Use them to call DxAPI to retrieve the air bound
- Dispatch an action to the
AirBoundstore with that promise
Note that you might need to adapt some models between AirBoundsSearchRequestModel and the airBoundsInput. Indeed the model contains extra properties that will not be used by DxAPI. Don't hesitate to create a new selector to adapt the model to match your needs.
Positive : You want to inject Store in your component, and its AirBoundsSearchStoreModule in your module.
Now as to where to run our logic in the container, remember we want to run it as soon as the component is instantiated, which can be translated in Angular lifecycle terminology as... ngOnInit! Since the search criteria store will never be updated on this page, we will only consider the first non-null value of the search stream. This way the subscription will be completed after this one value. This will prevent performance issues.
Note that your store will return a model with more data than what is expected by DxAPI, you will need to make sure to strip it to the bare minimum.
  public ngOnInit() {
    this.store.pipe(
      select(selectCurrentAirBoundsSearch),
      filter((search) => !!search),
      take(1)
    ).subscribe((search) =>
      this.callFlexPremium(search!));
  }

  private callFlexPremium(airBoundsInputs: AirBoundsSearchRequestModel) {
    if (airBoundsInputs.travelers?.length && airBoundsInputs.itineraries?.length) {
      const call = this.apiFactoryService.getApi(AirBoundApi).airBoundsShopping({airBoundsInputs: {
          travelers: airBoundsInputs.travelers,
          itineraries: airBoundsInputs.itineraries,
          commercialFareFamilies: airBoundsInputs.commercialFareFamilies
        }
      });
      this.store.dispatch(upsertAirBoundEntryFromApi({call}));
    }
  }
  public ngOnDestroy() {
    // clean the subscriptions
    this.subscriptions.forEach((subscription) => subscription.unsubscribe());
  }
That's it!
Now go back to your search page, submit it and look at your network tab + Redux Devtools to see your air-bounds populating the store!
Compute an observable of AirBoundGroup list
Now we want to have something to send to our presenter, and that something is going to be an array of AirBoundGroup that we have to get from the store.
What we need to do:
- Inject the store of
AirBounds - Select all the air bound groups inside
- Assign it to a variable of the container
Positive : You want to inject Store in your component, and its AirBoundsStoreModule in your module.
How do we select a value from a store?
We will use the ngrx operator select, giving it the appropriate selector function exported by the Otter library.
Here's an example of result:
    this.airBounds$ = this.store.pipe(
      select(selectCurrentAirBoundGroups)
    );
Now where do we run this code?
We probably need it at the time the component is instantiated too.
Positive : TypeScript will complain if you declared airBounds$: Observable, because no initial value is assigned at declaration or in the constructor.
This will be a common usecase in Angular what variables are initialized from ngOnInit, and to fix that there are two possibilities:
- Use the exclamation mark to tell TypeScript that it will have a value at runtime: ``airBounds$!: Observable<AirBoundGroup[]>``
- Make the property potentially undefined, at the cost of having to handle null checks later: ``airBounds$?: Observable<AirBoundGroup[]>``
d. upsell-form presenter
Let's leave the submission for later and focus on the presenter.
Here's our TODO list:
- Add an input to receive a list of
AirBoundGroupfrom the container - Display them in the simplest way. Remember, an AirBoundGroup correspond to a flight described in the BoundFlightDetails. It contains a list of AirBoundsItems that represents a price for that flight for a certain fare.
- Add a way for the user to select an air bound item and submit the selection
Add the air bound item input
That one's straightforward in the presenter.
For the container though, what we have is an observable but what we want to send to the presenter is the latest value emitted at any point in time.
Any idea how we could easily do that?
Positive : Check Angular pipes documentation for something to handle asynchronous situations
Display the air-bound-items
So it doesn't look too awful we can play with mat-list, mat-list-item and mat-divider.
For now, simply display the item ID and the departure date of the first flight.
We can come back later with a better approach: creation an bound-details component that takes an AirBoundGroup in input and handles a better display.
Example:
  <mat-list>
    <ng-container *ngFor="let boundGroup of bounds">
      <mat-list-item *ngFor="let bound of boundGroup.airBounds">
        <mat-radio-button  [value]="bound.airBoundId">
          {{bound.airBoundId}} - {{boundGroup.boundDetails.segments[0].flight.departure.dateTime | date:'HH:mm'}} -
          {{getBoundTotalPrice(bound) | currency : bound.prices?.totalPrices![0].currencyCode }}
        </mat-radio-button>
      </mat-list-item>
      <mat-divider></mat-divider>
    </ng-container>
  </mat-list>
  public getBoundTotalPrice(bound?: AirBoundItem) {
    return bound ? getFormattedTotal(bound.prices!.totalPrices[0]) : 0;
  }
As you can see, we iterate over both the bound-groups in the store and each bound-groups' air-bounds. In your page you shall see different items with the same departure date time. They all belong to the same group.
Negative : In this example, the getBoundTotalPrice method is used as input of the template. This is actually a bad practice. When rendering the template of this component, Angular is not able to identify if this method is pure or not and will compute it even if the inputs did not change. This pitfall can be easily avoid with a pure Pipe which will be re-evaluated only if the input changed. As a bonus exercise, try to move the getBoundTotalPriceLogic into a new pipe.
Example:
<mat-list>
  <ng-container *ngFor="let boundGroup of bounds">
    <mat-list-item *ngFor="let bound of boundGroup.airBounds">
      <mat-radio-button  [value]="bound.airBoundId">
        {{bound.airBoundId}} - {{boundGroup.boundDetails.segments[0].flight.departure.dateTime | date:'HH:mm'}} -
        {{bound.prices?.totalPrices![0] | formattedTotal | currency : bound.prices?.totalPrices![0].currencyCode }}
      </mat-radio-button>
    </mat-list-item>
  </ng-container>
</mat-list>
import {Pipe, PipeTransform} from '@angular/core';
import {Price} from '@dapi/sdk';
import {getFormattedTotal} from '@dapi/sdk/helpers';

@Pipe({
  name: 'formattedTotal',
  pure: true
})
export class FormattedTotalPipe implements PipeTransform {
  public transform(value?: Price) {
    return value ? getFormattedTotal(value) : 0
  }
}
import {NgModule} from '@angular/core';
import {FormattedTotalPipe} from './formatted-total.pipe';

@NgModule({
  declarations: [FormattedTotalPipe],
  exports: [FormattedTotalPipe]
})
export class FormattedTotalModule {

}
Do not forget to include your new module in your component.
Select an air-bound-item
Let's make it simple by using mat-radio-group and mat-radio.
Example:
<form #form="ngForm">
  <mat-radio-group required name="selected-offer-id" [(ngModel)]="selectedAirBoundId" (ngModelChange)="onSelectAirBoundItem($event)">
    <mat-list>
      <ng-container *ngFor="let boundGroup of bounds">
        <mat-list-item *ngFor="let bound of boundGroup.airBounds">
          <mat-radio-button  [value]="bound.airBoundId">
            {{bound.airBoundId}} - {{boundGroup.boundDetails.segments[0].flight.departure.dateTime | date:'HH:mm'}} -
            {{bound.prices?.totalPrices![0].total | currency : bound.prices?.totalPrices![0].currencyCode}}
          </mat-radio-button>
        </mat-list-item>
        <mat-divider></mat-divider>
      </ng-container>
    </mat-list>
  </mat-radio-group>

  <button [disabled]="!form.valid" mat-button class="submit" (click)="onSubmit()">Submit</button>
</form>
Notice the two event binds to onSelectAirBoundItem($event) and onSubmit()? This is because we'd like to update the store every time the user selects an offer to save it, and of course we want to know when the form is submitted to call the API.
This means we'll need two outputs in our presenters: one that emits the airBoundId that was just selected and another that can emit nothing, we'll see why later.
e. Container: handle updates
We have two things left to do in our container before calling it a day:
- Update the
AirBoundsstore's selected air-bound-item ID on the appropriate presenter event - Create a cart with the currently selected air-bound-item on the appropriate presenter event and notify the application
Select the air bound
That one is quite simple: the store is already injected, we just need to find which action does what we want.
It must have something to do with selecting and AirBound.
Create a shopping cart with air bound item
Let's do things differently here to play with API services.
Here's what we are going to do:
- Import the
CartStoreModule, and add theCartStoremodel to the store instance injected in our component. - Inject the
ApiFactoryServicein our component constructor. (no module to import, this service is provided by the ApiManagerModule imported in our AppModule. documentation - Get the air bound item ID that's currently selected
- Call the API to create a cart with our Offer ID (we could create an empty cart but that saves us a call)
- Dispatch that promise to the Cart store using the appropriate action
upsertAndSelectCartEntityFromApi - Emit a
submitevent for the page to handle any routing following the submission
It may be confusing to know which Action to dispatch or which selector to use depending on the situation.
Usually typing the name of your store and hitting you IDE auto-completion key shows you what's available, but another good solution is to go look at the definition files of the store or service in question.
You can do it by control-clicking their module.
For instance if I click on CartStoreModule in my container module it brings me to: 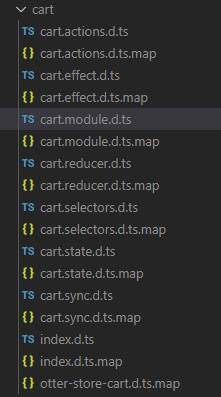
Remember the store files structure?
cart.actions.d.tsgives you all the available actions, with commentscart.selectors.d.tsall the available selectors, with comments
Solution
If all went well, you should see your new action dispatched in the Redux Devtools.
Additionally, you should see a new API call in your network tab to create the cart.
Example of those two functions implementation:
  public onSelectBound(boundId: string) {
    this.store.dispatch(selectAirBoundItem({entryIndex: 0, itemId: boundId}));
  }

  public onSubmit() {
    this.store.pipe(
      select(selectSelectedAirBoundIds),
      take(1)
    ).subscribe((selectedAirBoundIds: string[]) => {
      this.store.dispatch(upsertAndSelectCartEntityFromApi({
        call: this.apiFactoryService.getApi(CartApi).createCart({
          postCartBody: {
            airBoundIds: selectedAirBoundIds
          }
        })
      }));
      this.submit.emit();
    });
  }
f. Bonus: synchronize air-search-criteria in session storage
Aren't you tired of having to go through the search screen every time you refresh the page or save a new code change?
Otter stores are exported with meta-reducers that you can use to synchronize them with the browser's local or session storage in order to persist some data.
While it's probably not a good idea to persist offer prices since they can change frequently, search criteria would be a good candidate for that.
The good news is that it's not even that hard!
Everything happens in your application module, you want to find where we define localStorageStates and change it to something like:
const localStorageStates: Record<string, Serializer<any>>[] = [
  {[AIR_BOUNDS_SEARCH_STORE_NAME]: airBoundsSearchStorageSync}
];
If you ever want to synchronize another Otter store, simple add a new entry to the localStoragedStates list.
Launch a search, and press F5 from the upsell page.
Wait a bit and you should see offer popping!
g. Bonus: add a guard to redirect to the search page if there are no air-search-criteria
We can also do some advance routing to make our application behave even more smoothly.
Guards are function that are executed:
- When entering a route, to know if it can be reached or rerouted elsewhere. Called
CanActivate - When leaving a route, to know if it can be left. Called
CanDeactivate
More info in the official documentation
Our goal would be to add a CanActivate guard to the upsell route in order to:
- Check if there is a selected
AirBoundSearchRequest - If not, reroute to the
searchpage. Else let the page display.
Positive : A guard is an @Injectable that has to be provided in the component's module, as well as being defined in its route definition
Solution
Example of Guard (in a new file upsell.guards.ts):
@Injectable()
export class UpsellCanActivate implements CanActivate {

  constructor(private store: Store<AirSearchCriteriaStore>, private router: Router) {}

  canActivate(): Observable<boolean | UrlTree> {
    return this.store.pipe(
      select(selectCurrentAirBoundsSearch),
      map((search) => !!search || this.router.parseUrl('/search'))
    );
  }
}
Here's what the upsell.module.ts would look like:
@NgModule({
  imports: [
    RouterModule.forChild([{
      path: '',
      component: UpsellComponent,
      canActivate: [UpsellCanActivate],
      resolve: {queryParam: UpsellResolver}
    }]),
    CommonModule,
    UpsellFormContModule,
    AirBoundsSearchStoreModule
  ],
  declarations: [UpsellComponent],
  exports: [UpsellComponent],
  providers: [UpsellResolver, UpsellCanActivate]
})
export class UpsellModule {
}
h. Bonus: add a spinner global to the application when something's going on
While loading air-bounds or creating a cart it's a bit awkward that the user has no feedback that something's happening.
Let's try the following in the app.component:
- Create an observable
isLoading$that is true if any of theAirBoundsStoreorCartStoreis loading. - Wrap the
router-outletcomponent in a div, and use the value of this observable to hide that div with CSS - Show with an *ngIf a
mat-progress-spinnercomponent
Negative : This time we do not want to import the store modules in our app.component.
Why you may ask? Because by doing so we'd make our main application bundle bigger for no reason other than managing our spinner. We will cope without importing them here, and the only consequence is that the corresponding state will be undefined until this store has been imported by a lazy loaded route.
Hint: Pay attention to specify the following input to mat-progress-spinner or it will be invisible: [mode]="'indeterminate'".
Hint2: You will need to combine two selections of the store.
You may wonder why do we use CSS to hide our page content instead of a simple *ngIf.
The reason is that *ngIf would destroy all the components in our page, execute their ngOnDestroy functions and create them again when the spinner ends, which is not exactly what we want here.
When done, reload your application and perform a search and submit an offer selection.
Not too shabby, isn't it?
Solution
app.component.ts
  this.isLoading$ = combineLatest([
    this.store.pipe(
      select(selectAirBoundsState),
      map((airBoundState) => {
        const currentAirBoundEntry = (airBoundState && airBoundState.entries) ? airBoundState.entries[0] : undefined
        return !!currentAirBoundEntry && currentAirBoundEntry.isPending;
      }),
    ),
    this.store.pipe(
      select(selectCartsState),
      map((cartsState) => !!cartsState && !!cartsState.isPending)
    )
  ]).pipe(
    map(([airBoundIsPending, cartIsPending]) => airBoundIsPending || cartIsPending),
    share()
  );
app.component.html
<app-header-cont></app-header-cont>
<div class="app-content mat-card" [ngClass]="{ hidden: (isLoading$ | async) }">
  <router-outlet></router-outlet>
</div>
<mat-progress-spinner *ngIf="isLoading$ | async" [mode]="'indeterminate'"></mat-progress-spinner>
Going further
We could even include routing event in the isLoading$ computation to make it so that we show a spinner when navigating from a screen to another.
Conclusion
Here's what it could look like: 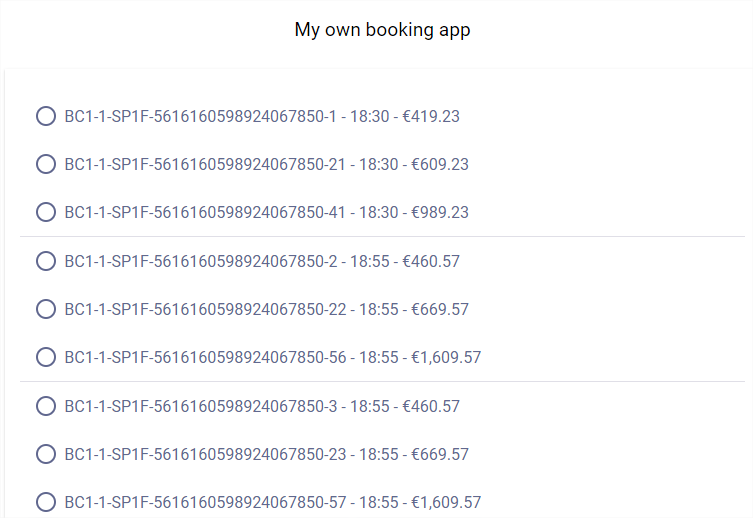
And remember that we can change the presenter however we want, all the rest is already in place and working!
Yes you probably noticed that we're not going to be innovative here, but we will stick to the usual booking flow.
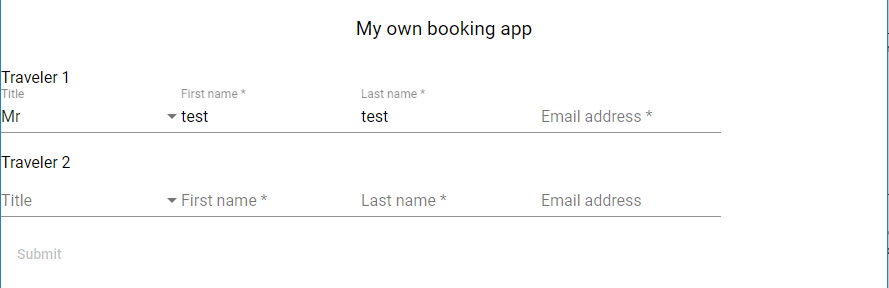
The next step in our journey will then be to ask the user to enter its passenger and contact information!
In order to simplify our lives a bit, here are our requirements:
- Request a _title, firstName, lastName and email for every traveler in the shopping cart
- email is only mandatory for the first traveler in the list
- All that in one single form
How does it translate into a developer's TODO list?
- create a new page
traveler-details - create a new container/presenter
traveler-details-form - define a contract that will be used between the container presenter, called
TravelerDetailwith the data you think meaningful - in the container, compute an observable that emits the list of
TravelerDetailcorresponding to what's in the store (because you will have empty travelers at first, and may come back to modify them later) - in the presenter, display form fields for the appropriate information we want to populate its corresponding
TravelerDetailwith, send them to the container on form submission - in the container and on a form submission, dispatch an action to the
Cartstore with the relevant API call to modify the travelers in the cart.
This time we won't guide you through all the steps, but instead give you a couple of hints and let you figure out the rest.
a. Navigation
Don't forget to navigate from the upsell page to the new traveler-details when it's submitted.
b. TravelerDetail
The first important thing is to give some thoughts about what data our container/presenter couple will be exchanging.
We want to collect (or update) the title, firstName, lastName and email of our travelers.
Since at that point they already exist in our shopping cart as anonymous travelers, they already have an ID that we need to keep track of.
That's because we need to be able to associate the changes requested by the presenter to a traveler ID in order to call the API.
So here's a proposal of such a contract:
export interface TravelerDetail {
  /**
   * The ID from DxAPI that we will use to PATCH the traveler
   */
  id: string;

  title?: string;

  firstName?: string;

  lastName?: string;

  email?: string;
}
c. The form
Your presenter will receive a TravelerDetail[] as input.
What you'll want to do is iterate on those, and for each of them display the appropriate fields with the appropriate two-way binding.
Here again we recommend template forms for simplicity but feel free to try and implement the same with reactive ones.
Warning: If you use template forms, think twice when binding any [(ngModel)] to your component's @Input() properties. This will mutate the input itself, which kind of breaks angular's contract. More importantly, if the input was taken from the store directly (ex: Traveler[] from your cart), you'd be modifying the current state of your store !
Fortunately for us it's not the case here since we compute our contract in our container, but it's still a good practice to copy the input so that we do not mutate it.
d. The submission
Api call
You have two choices here (that you can see in the CartApi of the SDK):
- Updating contacts and travelers at the same time with an
updateCartoperation. - Updating both separately by using their respective update calls
patchTravelersInCartandpatchContactsInCart.
Warning: updateCart expects the full list of Traveler and Contact, even those that haven't changed.
Container logic v1
This one's a bit more fun.
Provided the TravelerDetail[] emitted by the presenter, you'll need to:
- For every
TravelerDetail, copy their correspondingTravelerobject from theCart(because we don't want to mutate them), and patch this copy with the new information from theTravelerDetail - For every
TravelerDetail, create anEmail(with hardcodedpurposeandcategory) if theTravelerDetailcontains an email. ThisEmailshould be associated it to atravelerId.
Bonus: Container logic v2
The good thing about DxAPI is that you can go back to modify some information.
So to make our logic more robust we could:
- create a contact only if we find no
Emailassociated to ourtraveleId. Otherwise we'd rather update the existing one. - Call the API only if there is something to change.
e. Bonus: Support multiple travelers
As a bonus, we could come back to our search-form components to add a new field to enter a number of travelers.
It could be a simple mat-select with options from 1 to 9, 1 being the default value.
Of course, you'll also need to modify the contract and container's logic to include them in the AirBoundsSearchRequest.
f. Bonus: Enrich the global loading$ observable
As of now we spin when:
AirBoundsstore is globally loadingCartstore is globally loading
But we don't when submitting the travel details form because only our Cart entity is set to isPending, not the global state (remember, CartStore is an entity store).
So you can try to add a new condition under which isLoading$ would be true, that is when our current cart is isPending.
Example of result
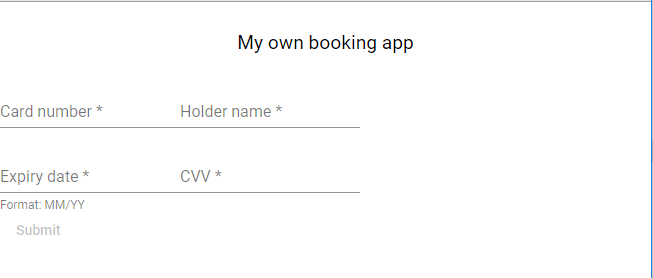
Yet another form!
That one is more straightforward though since we're not trying to patch something that exists in the Cart.
Here are our requirements:
- A new
paymentpage displayed once the user has filled the traveler details - That contains a form asking for the usual credit card information: card number, card vendor, holder name, expiry date and cvv
- And turns the
Cartinto anOrderusing the card information when the form is submitted.
This time we let you figure out your developer's plan by practicing all that you have already done for other pages.
To get a result that can be easily compared with the sample repository though you can go with the following naming:
paymentfor your pagepayment-formfor your container/presenter couple- You don't need to define a contract here, you can reuse a model from
@dapi/sdkinstead. (to find it, look what thecreateOrderfunction of theOrderApiexpects as parameter)
Hint: The card vendor can be a mat-select with common vendors such as VI, CA etc...
To test a payment you can use the following card:
number: 4012999999999999
vendor: VI
holder: any
expiry: any
cvv: any
Bonus: Enrich the global loading$ observable
Now that we're dealing with a new store, you can enrich your isLoading$ observable one more time, this time adding the information if the Order store isPending.
Conclusion
As usual here's an example of what your payment page could be like:
That's it!
It's the end of our simplistic booking flow.
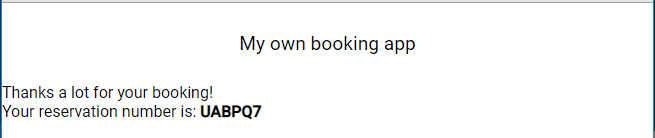
This last page will be easy as pie:
- It will be displayed after the payment if it succeeded
- It simply shows a gentle confirmation message with the Order ID (which happens to also be the PNR number)
For the sake of practicing, let's stick with our page + container/presenter pattern and call them both confirmation.
Navigate to confirmation only if the payment succeeded
There are multiple ways to achieve it, but since we haven't played with CanDeactivate guards yet that's a good opportunity to do so.
This kind of guard can decide whether the page allows for a navigation out of it to happen or not.
They have to be @Injectable and to implement the interface CanDeactivate.
They also have to be in the declarations and in the route properties of your component's module.
Here's the solution:
@Injectable()
export class PaymentCanDeactivate implements CanDeactivate<ConfirmationComponent> {
  constructor(private store: Store<OrderStore>) {}

  canDeactivate(): Observable<boolean> {
    return this.store.pipe(
      select(selectOrderState),
      filter((orderState) => !orderState.isPending),
      take(1),
      map((orderState) => !orderState.isFailure)
    );
  }
}
The confirmation page
You should be able to figure the rest out by yourself, you can pass the full Order to your presenter and display only its ID if you want (or only pass its ID).
Conclusion
You've done it!
You've coded a functional booking flow from nothing.
Of course, it's far from perfect:
- The look and feel could be nicer
- We don't support round trips at all
- There is no error handling
- There is little form validation
- The search page misses a couple of fields (cabin, children, infants, return date, ...)
- The upsell page couldn't be worse
- We don't know what we've chosen past the upsell page
- The passenger page is not so bad but wouldn't support infants and needs to ask for date of birth in some cases
- The payment form is as simple as it can be
- The confirmation page could use some recap of the trip
Still, you've implemented some not so basic things and that in a pretty timely manner.
The good thing of using stores and everything is that this application could serve as a skeleton while people work on pages separately without impacting each other.